Making a list and checking it twice: 6 things I do before every trip


I am a planner. I always have been. If you're not, you'll likely smirk at my pre-trip process of loading my smartphone with everything I might need on vacation — from contacts to tickets to maps to walking directions. But hear me out, you might benefit from this approach too. It feels great to have everything accessible and in one place. (Well, two places since I always print everything out too as a backup.)
Here's what I do before each trip to make sure everything goes smoothly:
Create a "trip" group in my contacts database
As a trip approaches, I sit down my with smartphone and make sure contact info for every element of the trip is captured. I create a group in my contacts manager and name it by destination. For example: Paris.
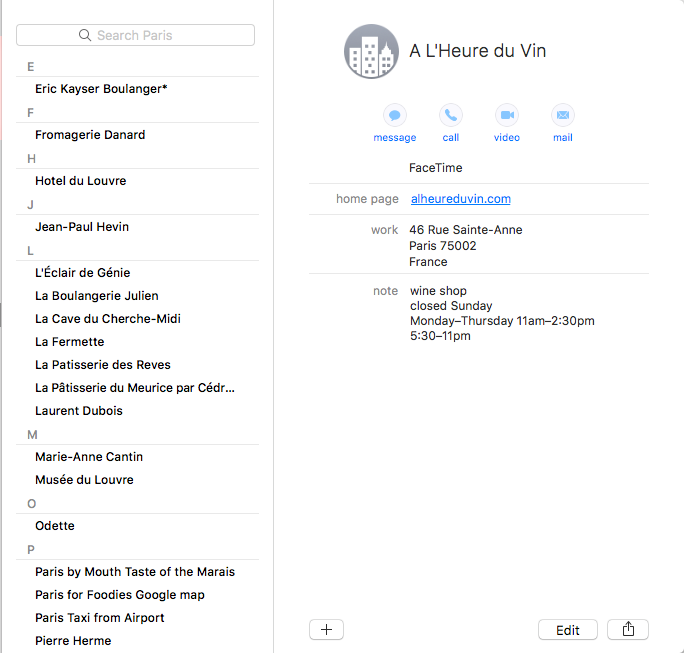
I add a contact for our flights. In the notes field, I include the reservation's PNR, eticket numbers, our seat locations and local customer service phone numbers.
I also create a contact for every airport lounge we're eligible to enter along the way, even airports where we are scheduled for a short layover. Things can and do go wrong and when they do, I want to know which lounge I can use now that we'll be hanging around longer than expected.
If I've purchased trip insurance, I make sure I've got that in my smartphone too. I include local phone numbers, email addresses, URLs and our policy number. I also include information for our annual MedJet plan that provides emergency evacuation if need be.
Download any boarding passes and tickets
Whether or not I plan to use mobile boarding passes, I download them to my phone just in case. I make sure I have the newest version of the airline's app on my phone and make sure our reservation is showing accurately when I log in.
Likewise, if I've purchased any sort of tickets, maybe to a museum or hop-on hop-off sightseeing bus (they're cooler than you think!), I download them to my phone — even if I have paper tickets in hand. Things can go missing en route and having the digital backup is reassuring.
Make a Google map
This is probably my favorite part of trip-planning: building a Google map that shows all of the points of interest we want to visit. I build the map once, share the URL with any fellow travelers and we can reference it anytime we want throughout the trip. The visual representation helps me plan our days.

To make your own map, log in to Google's My Maps. In the upper-left corner, click the "Create a New Map" button. An untitled map will pop up. Title it whatever you wish.
Then, create "layers" by clicking "Add layer." Each layer represents a different type of location. For example, on a recent foodie tour to Paris, I created layers to point out cheese shops, bakeries, pastry shops, restaurants, wine shops and grocery stores. Each type of location gets its own color so, at a glance, I can look at where we are in the city and see if a cheese shop or bakery is nearby.
Once you've created a layer, just type in a location you want to find on the map that goes in that section. For example, if you create a "Museums" layer, just type the name of the first museum you want to pin to the map in the white search bar. Click the blue magnifying glass to search and the location pops up. Click "add to map." It's as easy as that. Once you've finished adding all of your destinations, your map will look like this:
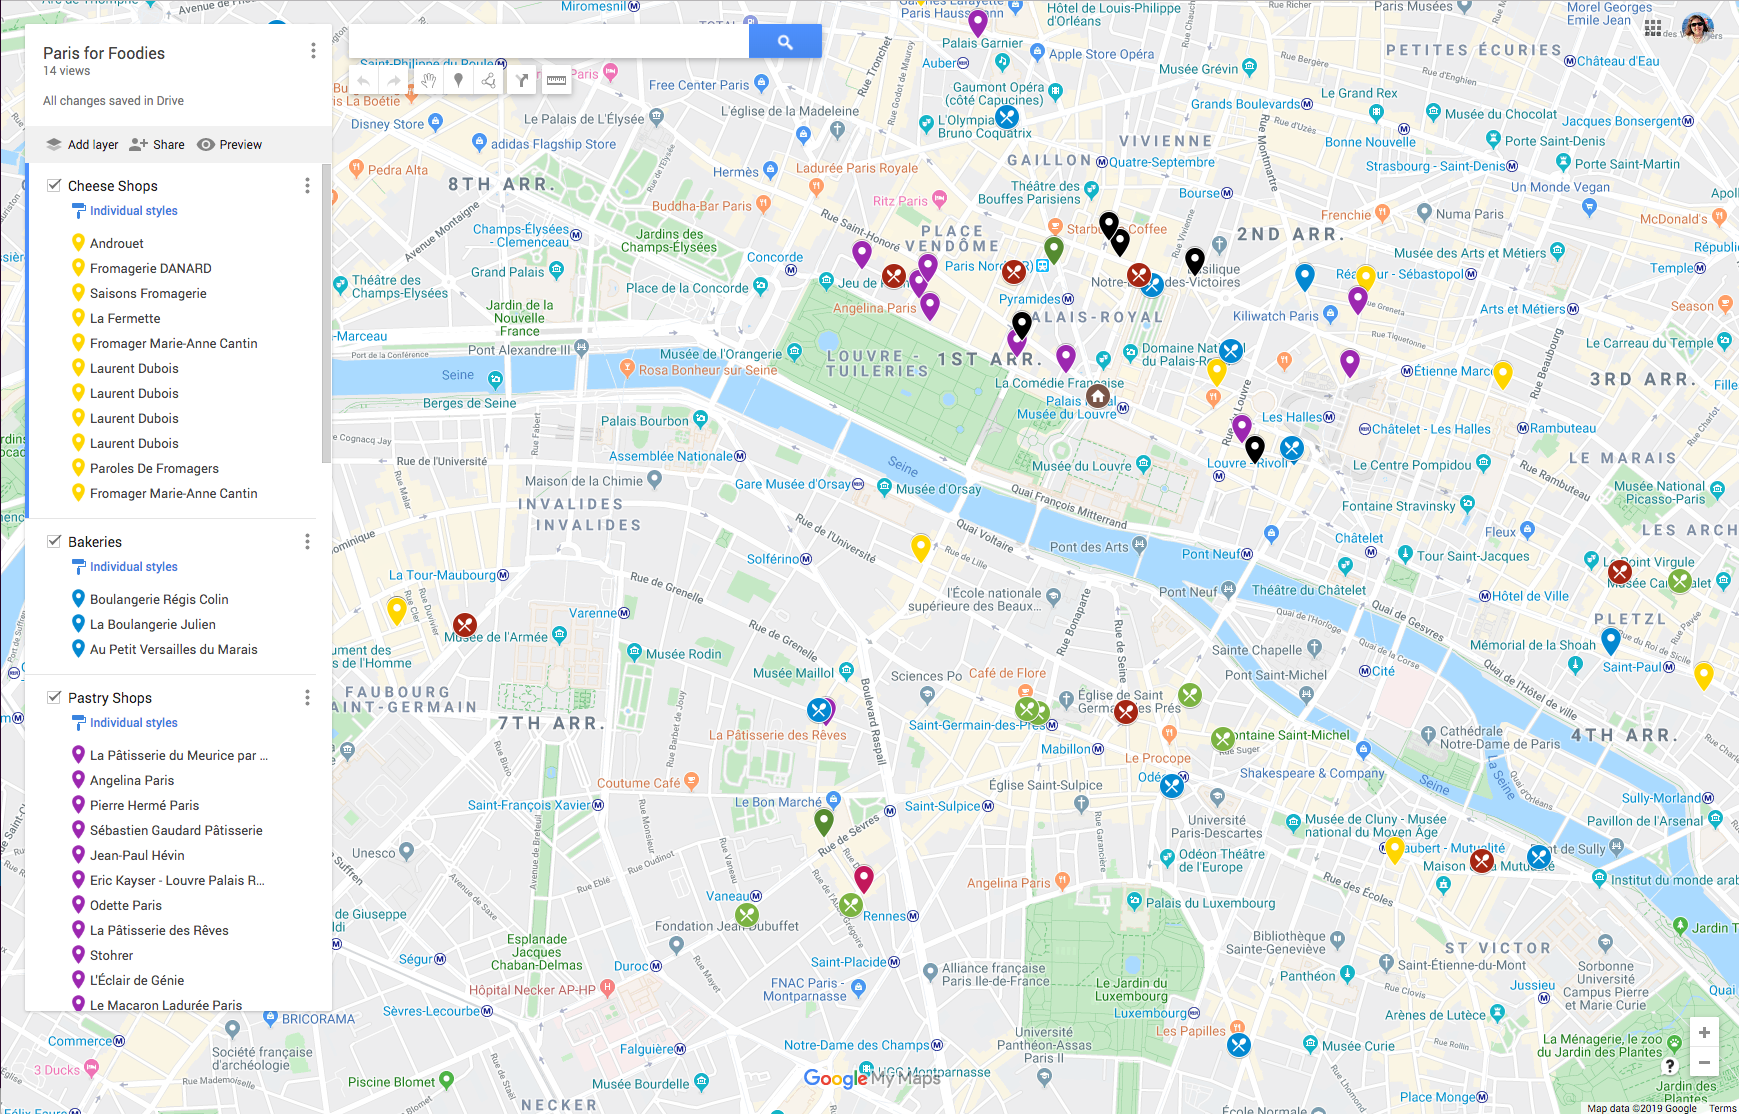
Map layers are also great for family trips when everyone is interested in different things. Create a layer for each family member and pinpoint the sights of interest. You can then use the map to help create a tour plan that blends everyone's interests without doing too much backtracking.
Create directions to send to my phone
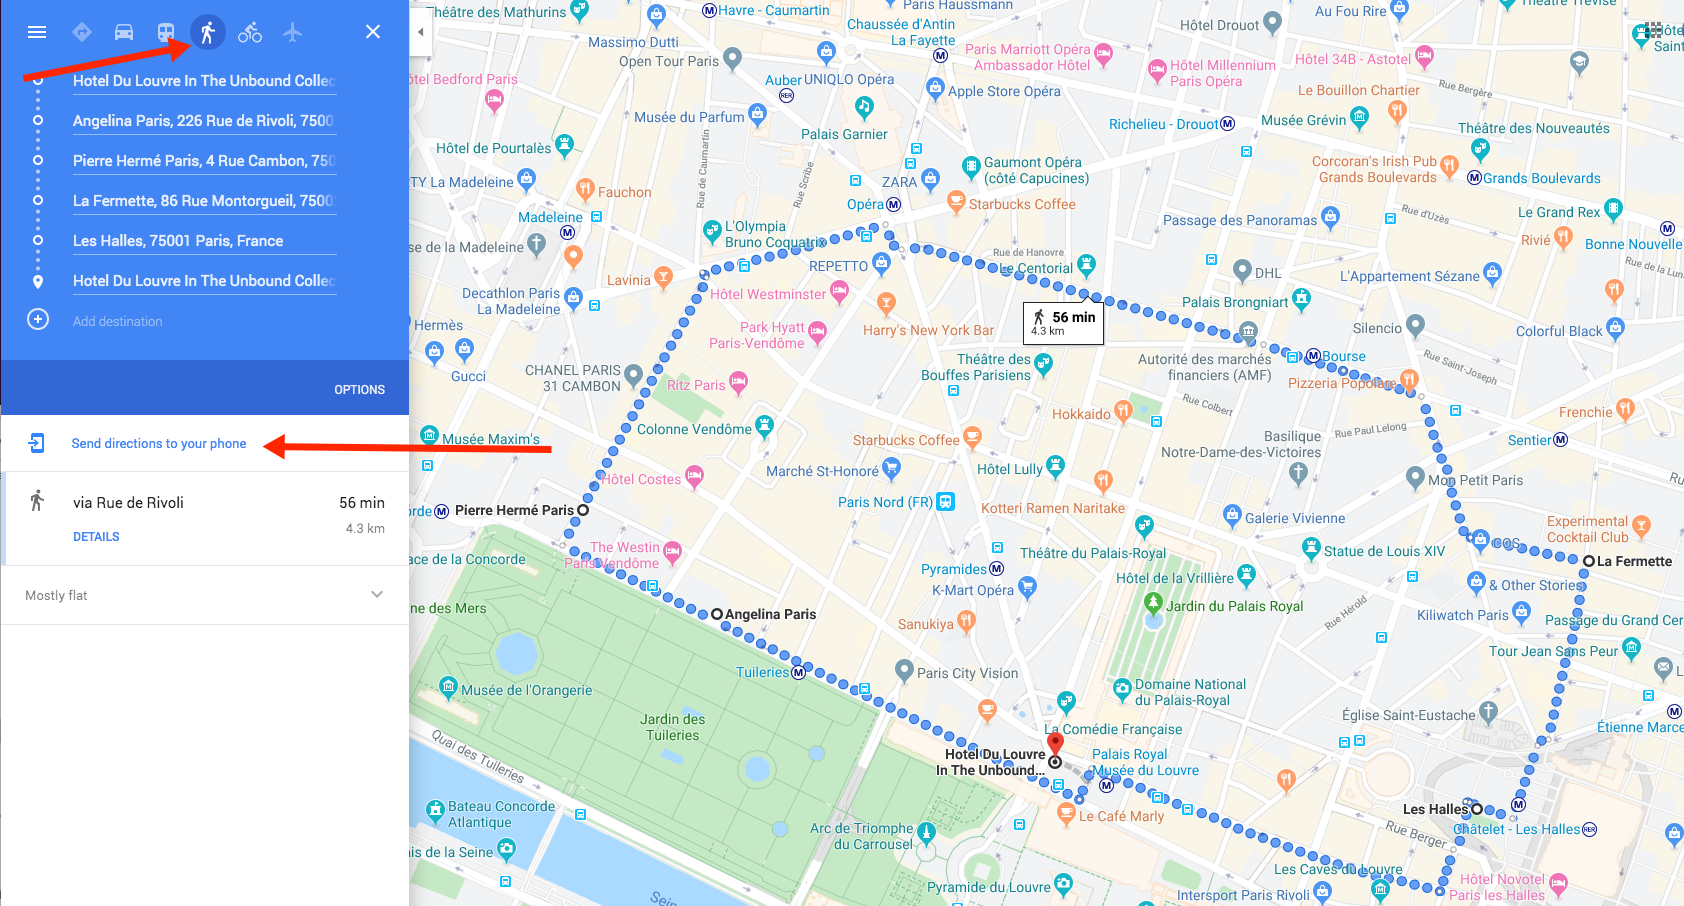
Once I've made my Google map and have an idea of what we'll do on which days, I can create a navigational walking (or driving or biking) plan using Google directions. Just go to maps.google.com, type in your starting point, click on "Directions" and then add each new destination. When your "trip" is complete, be sure to select the method of transport at the top of the page. (I picked walking as our mode of transportation for the trip below.) Then click the "Send directions to your phone" link. You can decide if you want Google to text or email the link to the directions. I use the text option but either works. When you're ready to take that trip, just open the text, click the link and Siri will dole out instructions as you walk.
Download any apps I may need
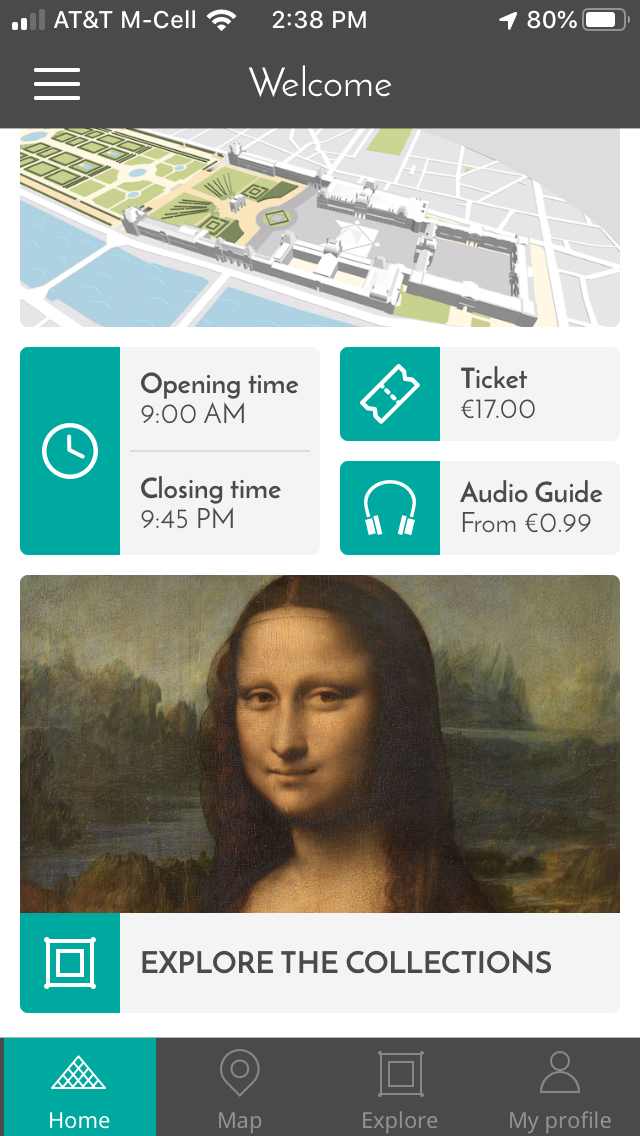
For certain trips, we may need things like a weather app specific to the region, a currency converter or a translator. (Google Translate worked well on our last trip with the exception of one restaurant that had no Wi-Fi. It was inside a concrete building that made it impossible for me to get a connection. Drat!) For our Paris trip, I downloaded the Louvre's app, which made finding our way through the labyrinthine museum quite simple. I had purchased trip insurance from Allianz so I loaded its app to my phone too.
Also, if you're traveling with someone else, make sure they also add any mission-critical apps to their phones. You want to be sure you always have access to these services — even if your phone's battery dies. You can always log on to the app from someone else's phone in an emergency. Sometimes, you just have to commandeer a family member's phone to load the apps yourself. You don't want to be trying to download an app at a moment when you really need it.
Take pictures of important documents and more
Finally, I take some photos with my smartphone as a backup in case I need a reference image while we're away. For example, once our bags are packed, I take photos of each of them — whether we're checking them or not. If something goes awry, having a detailed description of the bag helps to get it back sooner rather than later.
I also take photos of the front and back of the credit cards we're taking — after I've double-checked to make sure we're bringing cards that don't charge foreign transaction fees. And yes, my husband and I have an ongoing "disagreement" as to whether this is a good idea or not. I also take photos of our passports and health insurance cards (and I keep a paper copy tucked in my backpack too).
Bottom line
I like having a repeatable process whenever I get ready for a trip — especially if it's to a far-flung location where we've got a lot of different arrangements and reservations. Having quick access to all the information about our trip lets me make on-the-fly changes. Suppose the restaurant we were heading to for lunch is closed for renovation? No problem. I've got a list of substitute options — good options — right in my smartphone (with a paper copy of all that data tucked safely in my backpack). This smartphone approach to trip data consolidation might not work for everyone but it's saved me numerous headaches on many trips. I just returned from Paris and now I can turn my attention to our next big trip: Vienna. The research commences right now!
TPG featured card

at American Express's secure site
Terms & restrictions apply. See rates & fees.
| 4X | Earn 4X Membership Rewards® points per dollar spent on purchases at restaurants worldwide, on up to $50,000 in purchases per calendar year, then 1X points for the rest of the year. |
| 4X | Earn 4X Membership Rewards® points per dollar spent at US supermarkets, on up to $25,000 in purchases per calendar year, then 1X points for the rest of the year. |
| 5X | New! Earn 5X Membership Rewards® points on prepaid hotel stays booked through AmexTravel.com or the Amex Travel App. |
| 3X | Earn 3X Membership Rewards® points on flights booked through AmexTravel.com, the Amex Travel App, or purchased directly from airlines. |
| 2X | Earn 2X Membership Rewards® points on prepaid car rentals booked through AmexTravel.com or the Amex Travel App and cruises booked and paid through AmexTravel.com. |
| 1X | Earn 1X Membership Rewards® point per dollar spent on all other eligible purchases. |
Pros
- Valuable dining and food-related credits
- Flexible rewards with airline and hotel transfer partners
- Multiple travel and purchase protections
- No foreign transaction fees
- Access to Amex Offers for additional savings (enrollment required)
Cons
- Not as useful for those living outside the U.S.
- Some may have trouble using Uber and other dining credits
- You may be eligible for as high as 100,000 Membership Rewards® Points after you spend $8,000 in eligible purchases on your new Card in your first 6 months of Card Membership. Welcome offers vary and you may not be eligible for an offer. Apply to know if you’re approved and find out your exact welcome offer amount – all with no credit score impact. If you’re approved and choose to accept the Card, your score may be impacted.
- Earn 4X Membership Rewards® points per dollar spent on purchases at restaurants worldwide, on up to $50,000 in purchases per calendar year, then 1X points for the rest of the year.
- Earn 4X Membership Rewards® points per dollar spent at US supermarkets, on up to $25,000 in purchases per calendar year, then 1X points for the rest of the year.
- New! Earn 5X Membership Rewards® points on prepaid hotel stays booked through AmexTravel.com or the Amex Travel App.
- Earn 3X Membership Rewards® points on flights booked through AmexTravel.com, the Amex Travel App, or purchased directly from airlines.
- Earn 2X Membership Rewards® points on prepaid car rentals booked through AmexTravel.com or the Amex Travel App and cruises booked and paid through AmexTravel.com.
- Earn 1X Membership Rewards® point per dollar spent on all other eligible purchases.
- Pay It® lets you tap in the American Express® App to quickly pay for small purchase amounts throughout the month and still earn rewards the way you usually do. Plan It® gives you the option to split up big purchases into equal monthly payments with a fixed fee. You’ll know upfront exactly how much you’ll pay.
- Updated! $120 Dining Credit: Earn up to a total of $10 in statement credits monthly when you pay with the Gold Card at Grubhub (including Seamless), Buffalo Wild Wings, Five Guys, The Cheesecake Factory, and Wonder. This can be an annual savings of up to $120. Enrollment required.
- $100 Resy Credit: Get up to $100 in statement credits each calendar year at over 10,000 qualifying U.S. Resy restaurants after you pay for eligible purchases with the American Express® Gold Card. That’s up to $50 in statement credits semi-annually. Enrollment required.
- $84 Dunkin' Credit: Earn up to $7 in monthly statement credits after you pay with the American Express® Gold Card at U.S. Dunkin’ locations. Enrollment required.
- $120 Uber Cash on Gold: Enjoy up to $120 in Uber Cash annually with your Gold Card. Just add your Card to your Uber account and you'll get $10 in Uber Cash each month to use on orders and rides in the U.S. when you select an Amex Card for your transaction.
- New! As an American Express® Gold Card Member, you can enjoy complimentary Hertz Five Star® Status. Enjoy benefits like skipping the counter at select locations, adding an additional driver at no additional cost*, and vehicle upgrades**. Benefit enrollment and Hertz Gold+ registration are required. *Additional drivers must meet standard rental qualifications and must be a spouse or domestic partner to qualify as complimentary. Other additional drivers subject to fees. **Benefits are subject to availability and vary by location. Additional Hertz program Terms and Conditions including age restrictions apply.
- Take advantage of a $100 credit towards eligible charges* at over 1,300 upscale hotels worldwide when you book The Hotel Collection through AmexTravel.com or the Amex Travel App **. *Eligible charges vary by property. **The Hotel Collection requires a two-night minimum stay.
- Book your travel through the Amex Travel App with added peace of mind – backed by American Express® service and support. Only for American Express® Card Members.
- Whenever you need us, we're here. Our Member Services team will ensure you are taken care of. From lost Card replacement to statement questions, we are available to help 24/7.
- No Foreign Transaction Fees.
- Annual Fee is $325.
- Terms Apply.