Tips for using a smartphone to photograph the northern lights


Editor's Note
I was lucky enough to catch the elusive northern lights on a special delivery flight, Singapore Airlines' first 787-10 Dreamliner delivery flight from Charleston, South Carolina, to Osaka, Japan, and finally on to Changi Airport.
As our flight approached the state of Alaska, flyers on the starboard side were treated to a magnificent display, which — with much effort — I was finally able to clearly capture with my point-and-shoot camera.
At that moment, I pledged to see the northern lights from the ground — not far from our Dreamliner's flight path — in interior Alaska. That adventure became a reality in 2019 when I traveled up to the incredibly remote camp of Coldfoot, Alaska, along the state's famed Dalton Highway.
Capturing photos of the northern lights
Many of the best images you've likely ever seen on the northern lights have been taken with an extended exposure.

Since the lights are often quite dim, at least when compared with objects and effects captured in daylight, photographers often use shutter speeds of one second or longer. That means the lights don't look quite as vibrant in person, but, on a clear night, they look absolutely spectacular in photographs.
Generally, if you're using a "real" camera, you'll need a tripod — unless you have exceptionally still hands, which is especially challenging. In many cases, if you're joining an aurora tour, your guide will provide one, but you'll certainly want to confirm that in advance; you might not be able to capture sharp photos if you arrive unprepared. I also recommend bringing along a flashlight, to aid with focusing (more on that below).
In my opinion, there's a much better option, though.
The newer generations of smartphones can capture outstanding photographs in low light. In 2019, I was able to snap some incredible shots using only a handheld iPhone 11 Pro Max, and of course, there are even more advanced models and technology out since then.
I'll focus on Apple's night mode here since that's what I used, but other recent models offer similar functionality. Note that the process with some models that have come out even more recently than this may differ a bit, though the concepts likely remain similar:

- Select the content for your frame — consider mixing in mountains, trees, cabins and other structures, to make your pictures more interesting and add perspective.
- Open the native camera app and ensure focus — briefly light a tree or structure using a powerful flashlight, if your phone is struggling to focus on its own.
- Confirm that night mode is active — when using the 1x lens in "photo" mode on the iPhone 11 that was used at this time, an indicator will appear at the top left corner, while other smartphones may offer a dedicated "night" shooting option.
- Capture plenty of frames — the aurora effect changes quickly, so don't be afraid to snap away!
- Review your work every few shots to ensure that you're happy with focus, exposure and other details.
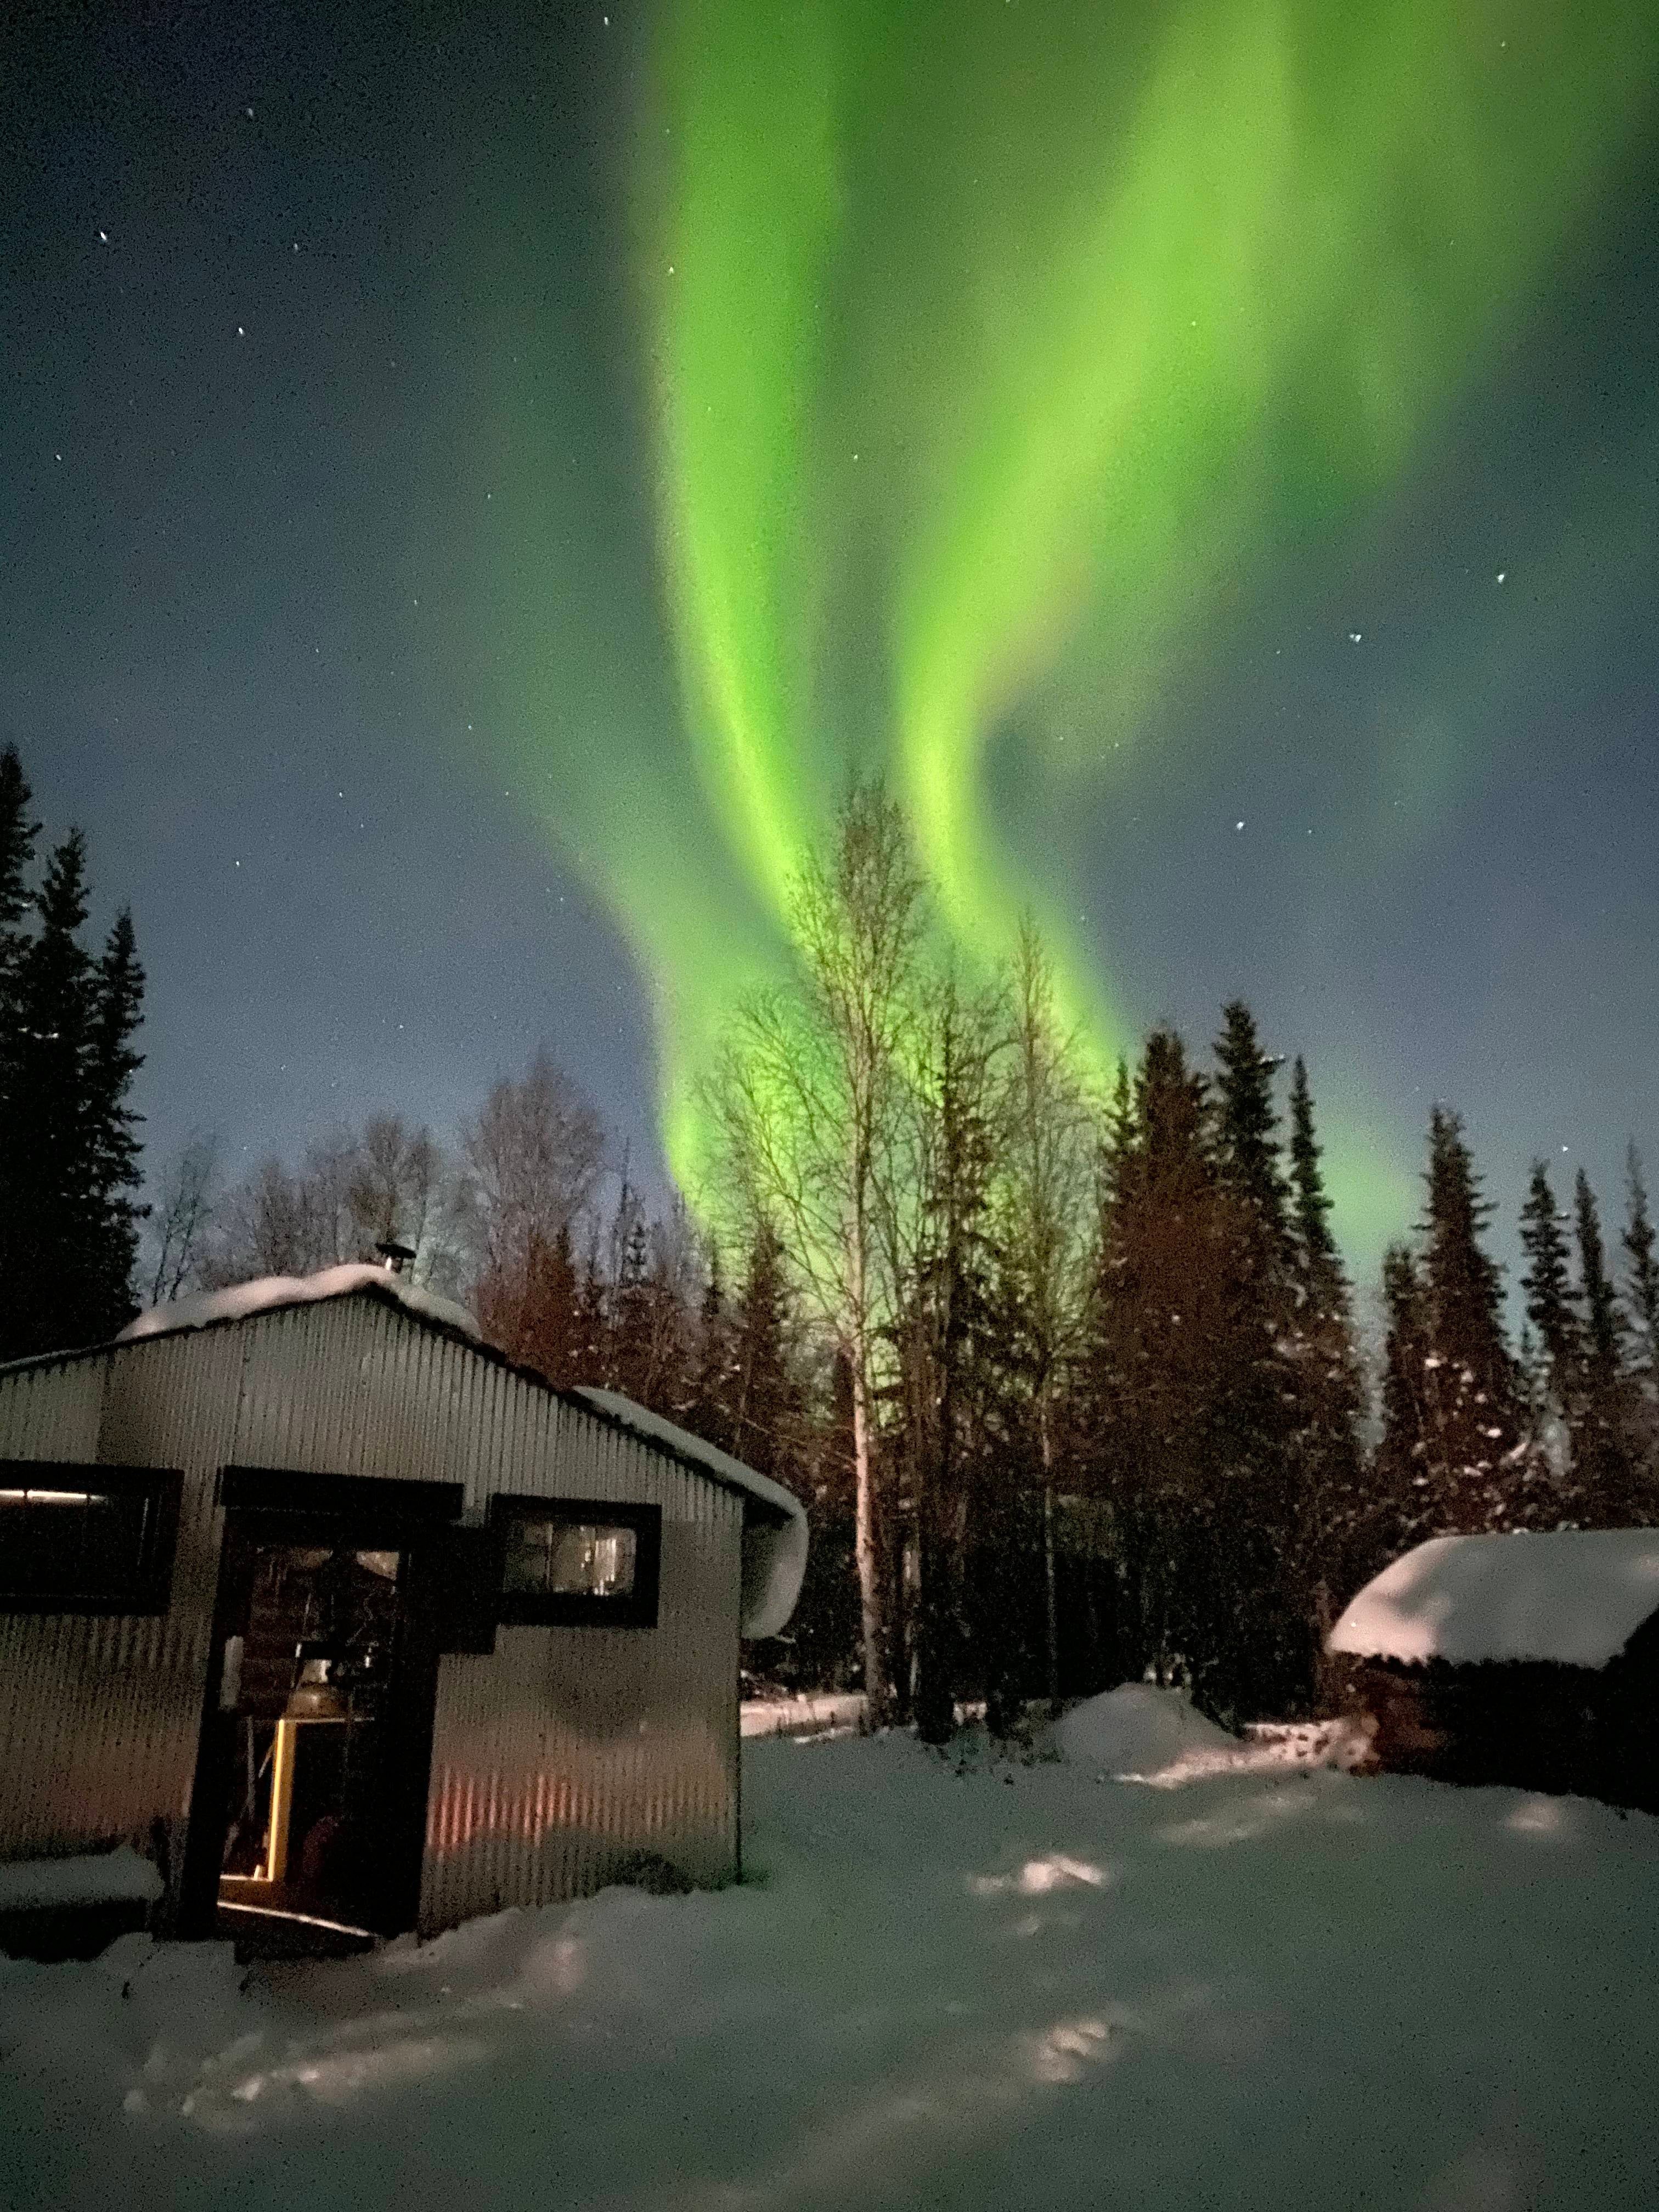
If all goes well, you should walk away with images that look something like this:
Related: Why the iPhone 15 is a game changer for travelers
Editing photos of the northern lights
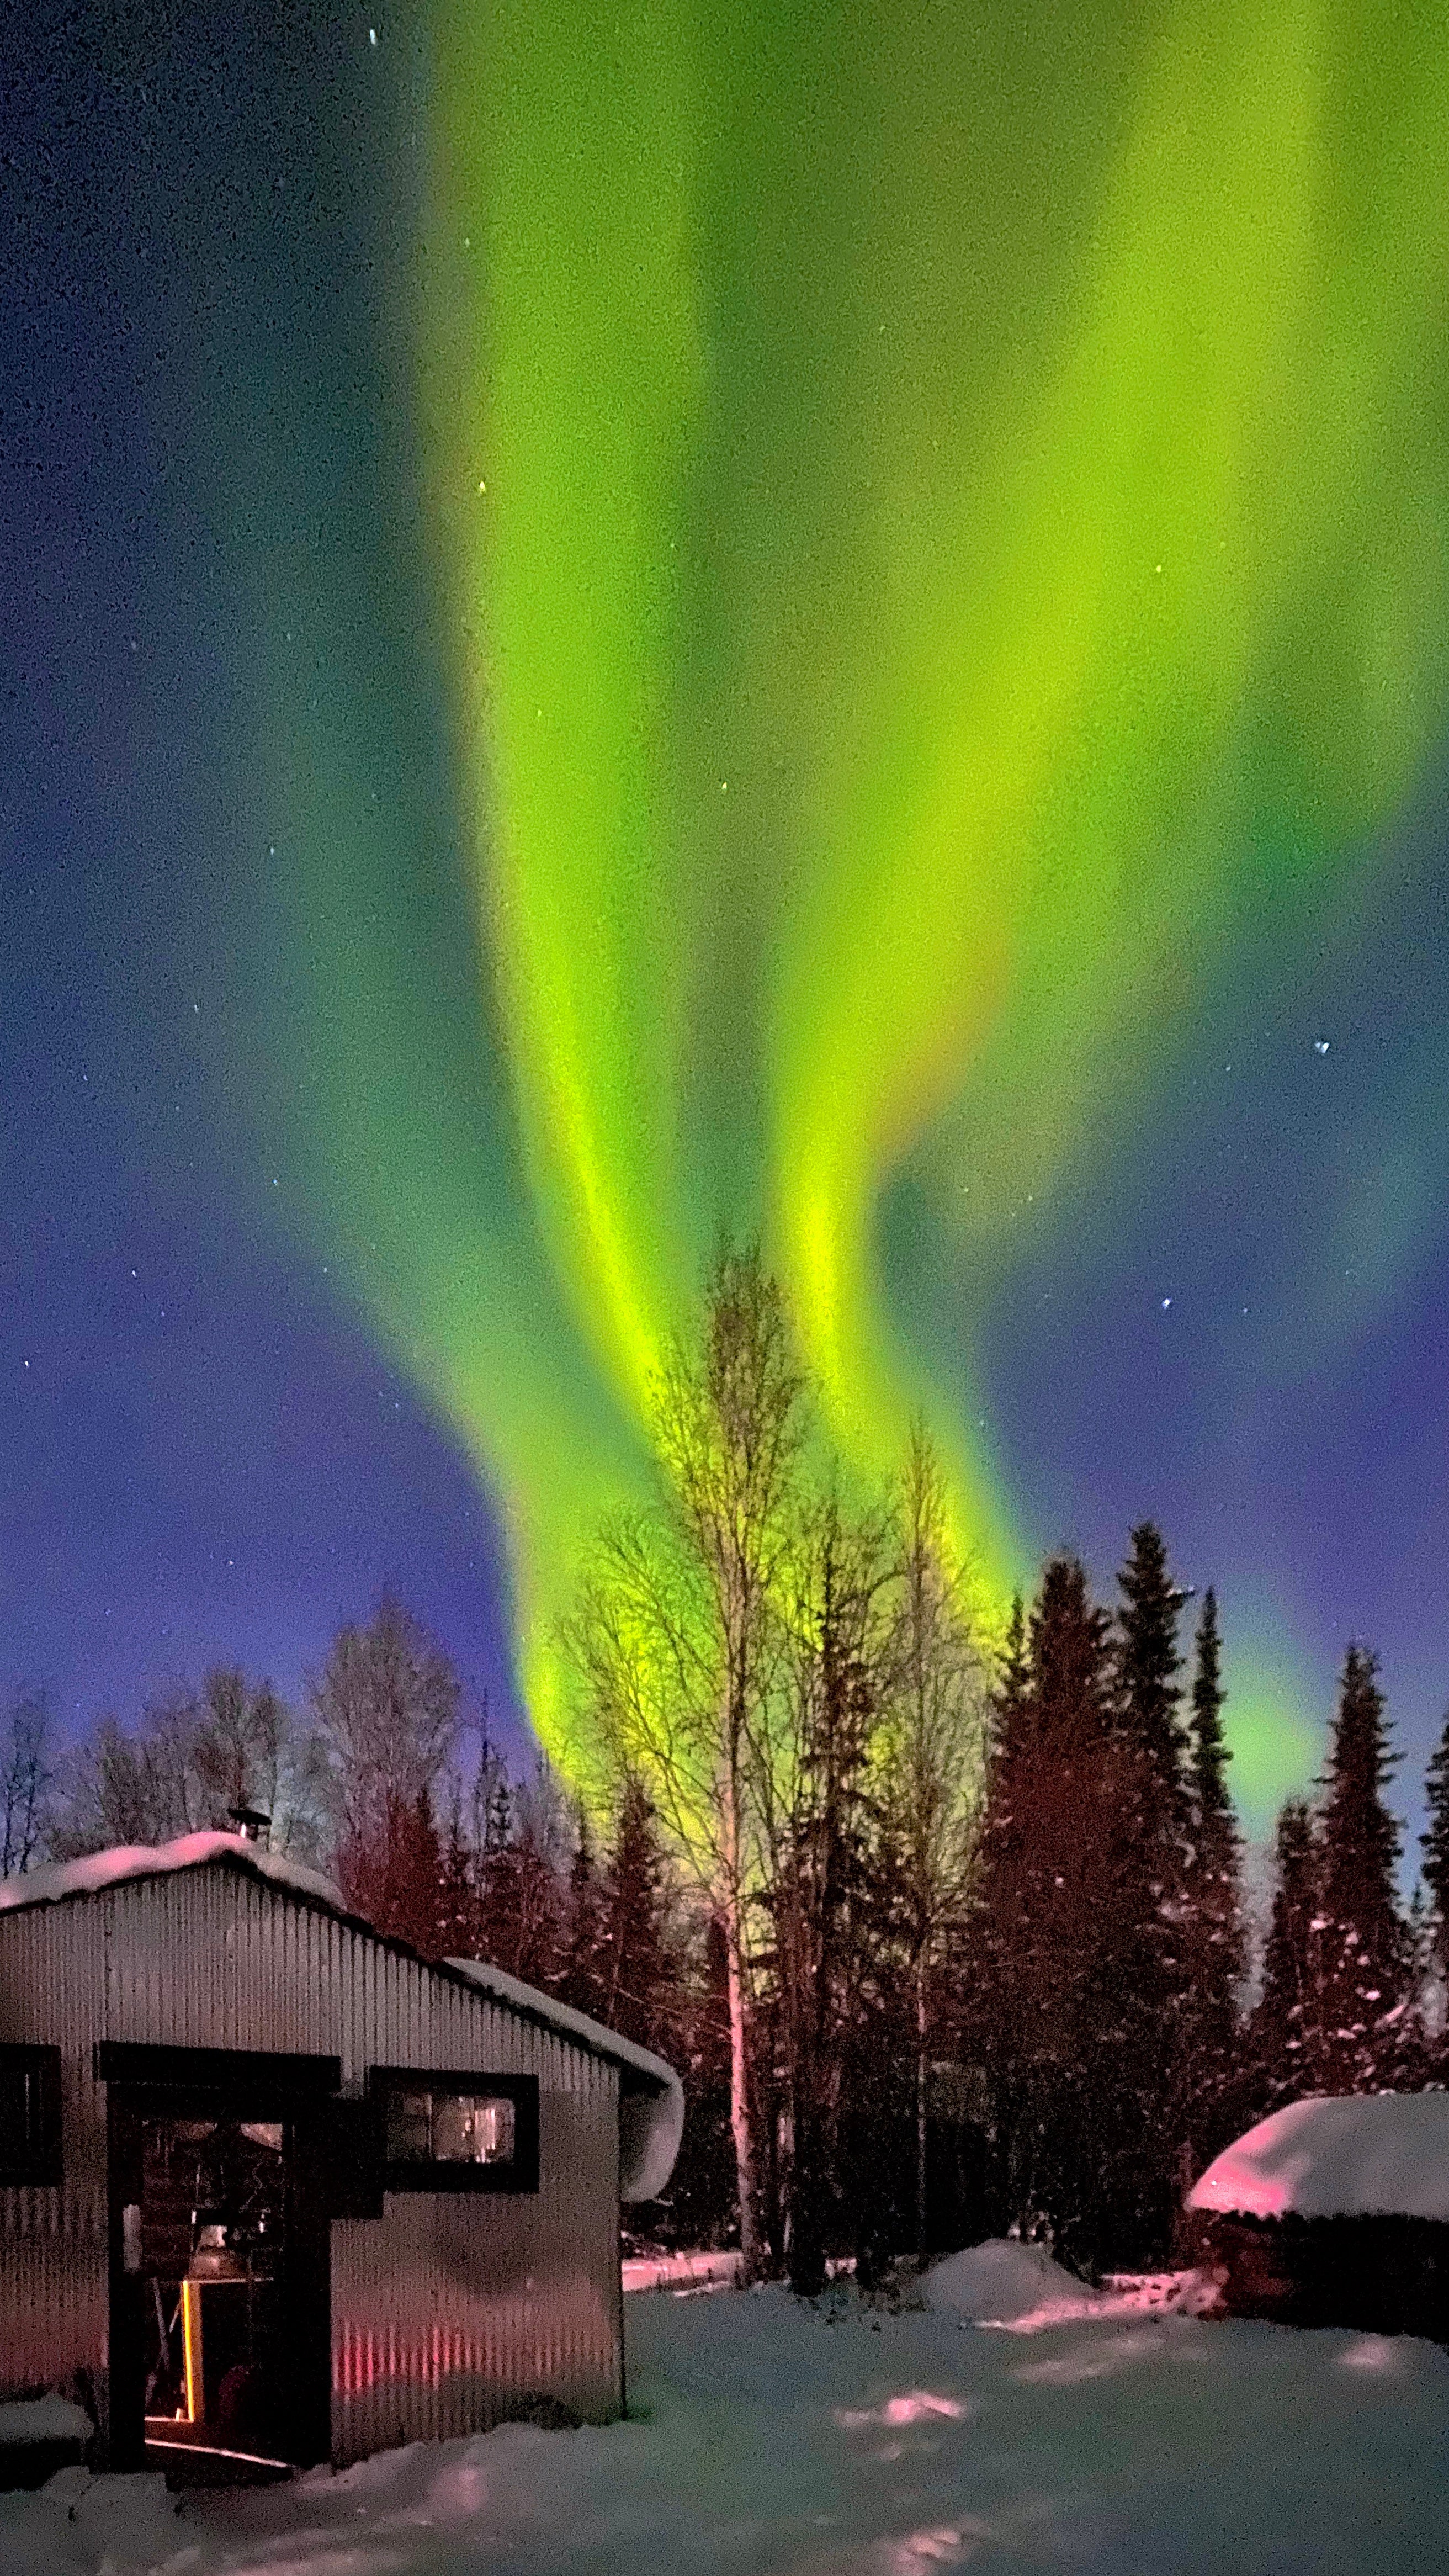
You may notice that the image above looks a bit dull compared to the finished product I included at the top. While you can certainly share an image directly from the phone, you can really make your shot pop by making some tweaks directly on your smartphone, as I did here:
For northern lights photography specifically, I recommend the following adjustments.
- Correct exposure as necessary — I didn't make any adjustments here.
- Reduce the highlights to bring out more detail in the northern lights — I adjusted to the full range (-100).
- Increase shadow levels to boost detail elsewhere in your image — I adjusted +18 here.
- Boost vibrance — I added 51 to this image.
- Reduce warmth — this is my preference, but I felt the image really popped with a warmth of -13.
- Adjust the tint — I added 94 to this image.
- Increase sharpness and definition, if necessary — here, I went up 20 and 91, respectively.
- Correct vertical or horizontal perspective, to ensure trees are aligned (this one's a bit complicated, so if you're not sure how to achieve this with your smartphone, feel free to skip this step).
The extent of your processing will depend on the image and your own preferences, of course — darker auroras may need a bit more work than brighter ones. If you're planning to share on your Instagram Story, you'll also want to crop the image to 9:16 within your photo app, to ensure maximum sharpness.
Related: Guide to taking a cruise to find the northern lights
How to find the northern lights
Typically, your best shot at capturing the northern lights is to head somewhere above the Arctic Circle, including in Alaska and Scandinavia, though there also are opportunities to see the aurora farther south, including in Iceland and sometimes -- such as this weekend -- even in the contiguous United States.
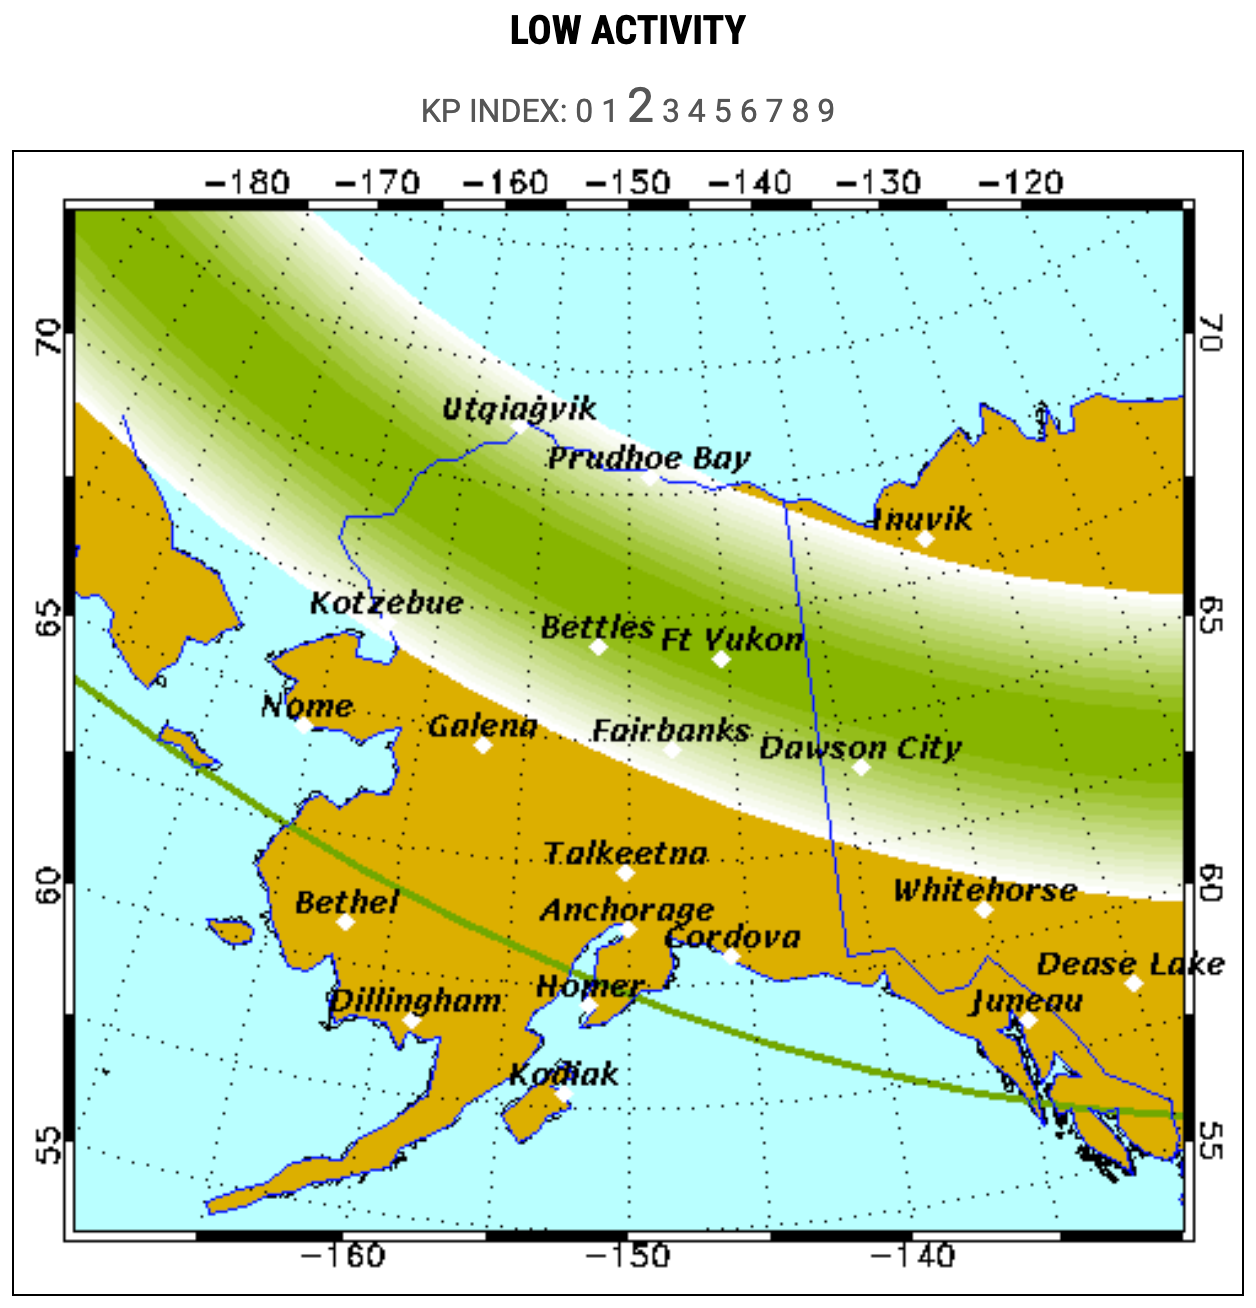
On my aurora-hunting trip, I decided to venture deep into the state of Alaska, a few miles past Coldfoot, a small truck stop, to the tiny village of Wiseman. Roughly 10 people live in Wiseman, and the village consists of little more than a few log cabins, but given its position directly below the auroral oval, you can see incredible activity throughout much of the sky on a clear night.
In fact, my visit happened to coincide with forecasted periods of low activity, but that simply affects the distance from which you can see the northern lights — the display was quite vibrant directly underneath. The full moon also had little impact — in fact, I found it helpful, since the moon lit up the nearby mountains and cabins.
The ideal viewing period varies depending on when and where you go — for my October visit to Wiseman, I was told we'd have the best show between midnight and 3 a.m., so plan for a very long day, perhaps broken up with a post-dinner nap.
Though my 5-degree-Fahrenheit night in October was considerably warmer than what you'll find in winter, when temperatures can drop to 40 below, you'll have a much better chance of seeing the lights later in the season. That includes the spring, when temperatures begin to warm again.
Just note that there's never any guarantee that you'll see activity, even on a clear night — I missed out on the second night, as clouds and snow came in after sunset, despite a clear forecast. The one variable you can control is your camera, however, and if you're going to spend the money to travel for the aurora, I highly recommend investing in the latest smartphone, too.
There are also apps such as My Aurora Forecast & Alerts that can give you alerts to help tell you when it's a good time to step outside and take a look up at the sky.
Bottom line
It's extraordinarily rare that the northern lights dip all the way south into Texas, Florida and even Mexico, but that gives so many of us a special chance to enjoy them without having to travel north in search of this magnificent natural phenomenon. And luckily, your smartphone can do a pretty good job of capturing the moment if you follow some of these tips.
Don't worry if you miss this round, as we are forecast to be in an extended period of higher-than-normal northern lights activity in case you feel inspired to start planning a trip for later this year with that main purpose in mind.
TPG featured card

at American Express's secure site
Terms & restrictions apply. See rates & fees.
| 4X | Earn 4X Membership Rewards® points per dollar spent on purchases at restaurants worldwide, on up to $50,000 in purchases per calendar year, then 1X points for the rest of the year. |
| 4X | Earn 4X Membership Rewards® points per dollar spent at US supermarkets, on up to $25,000 in purchases per calendar year, then 1X points for the rest of the year. |
| 5X | New! Earn 5X Membership Rewards® points on prepaid hotel stays booked through AmexTravel.com or the Amex Travel App. |
| 3X | Earn 3X Membership Rewards® points on flights booked through AmexTravel.com, the Amex Travel App, or purchased directly from airlines. |
| 2X | Earn 2X Membership Rewards® points on prepaid car rentals booked through AmexTravel.com or the Amex Travel App and cruises booked and paid through AmexTravel.com. |
| 1X | Earn 1X Membership Rewards® point per dollar spent on all other eligible purchases. |
Pros
- Valuable dining and food-related credits
- Flexible rewards with airline and hotel transfer partners
- Multiple travel and purchase protections
- No foreign transaction fees
- Access to Amex Offers for additional savings (enrollment required)
Cons
- Not as useful for those living outside the U.S.
- Some may have trouble using Uber and other dining credits
- You may be eligible for as high as 100,000 Membership Rewards® Points after you spend $8,000 in eligible purchases on your new Card in your first 6 months of Card Membership. Welcome offers vary and you may not be eligible for an offer. Apply to know if you’re approved and find out your exact welcome offer amount – all with no credit score impact. If you’re approved and choose to accept the Card, your score may be impacted.
- Earn 4X Membership Rewards® points per dollar spent on purchases at restaurants worldwide, on up to $50,000 in purchases per calendar year, then 1X points for the rest of the year.
- Earn 4X Membership Rewards® points per dollar spent at US supermarkets, on up to $25,000 in purchases per calendar year, then 1X points for the rest of the year.
- New! Earn 5X Membership Rewards® points on prepaid hotel stays booked through AmexTravel.com or the Amex Travel App.
- Earn 3X Membership Rewards® points on flights booked through AmexTravel.com, the Amex Travel App, or purchased directly from airlines.
- Earn 2X Membership Rewards® points on prepaid car rentals booked through AmexTravel.com or the Amex Travel App and cruises booked and paid through AmexTravel.com.
- Earn 1X Membership Rewards® point per dollar spent on all other eligible purchases.
- Pay It® lets you tap in the American Express® App to quickly pay for small purchase amounts throughout the month and still earn rewards the way you usually do. Plan It® gives you the option to split up big purchases into equal monthly payments with a fixed fee. You’ll know upfront exactly how much you’ll pay.
- Updated! $120 Dining Credit: Earn up to a total of $10 in statement credits monthly when you pay with the Gold Card at Grubhub (including Seamless), Buffalo Wild Wings, Five Guys, The Cheesecake Factory, and Wonder. This can be an annual savings of up to $120. Enrollment required.
- $100 Resy Credit: Get up to $100 in statement credits each calendar year at over 10,000 qualifying U.S. Resy restaurants after you pay for eligible purchases with the American Express® Gold Card. That’s up to $50 in statement credits semi-annually. Enrollment required.
- $84 Dunkin' Credit: Earn up to $7 in monthly statement credits after you pay with the American Express® Gold Card at U.S. Dunkin’ locations. Enrollment required.
- $120 Uber Cash on Gold: Enjoy up to $120 in Uber Cash annually with your Gold Card. Just add your Card to your Uber account and you'll get $10 in Uber Cash each month to use on orders and rides in the U.S. when you select an Amex Card for your transaction.
- New! As an American Express® Gold Card Member, you can enjoy complimentary Hertz Five Star® Status. Enjoy benefits like skipping the counter at select locations, adding an additional driver at no additional cost*, and vehicle upgrades**. Benefit enrollment and Hertz Gold+ registration are required. *Additional drivers must meet standard rental qualifications and must be a spouse or domestic partner to qualify as complimentary. Other additional drivers subject to fees. **Benefits are subject to availability and vary by location. Additional Hertz program Terms and Conditions including age restrictions apply.
- Take advantage of a $100 credit towards eligible charges* at over 1,300 upscale hotels worldwide when you book The Hotel Collection through AmexTravel.com or the Amex Travel App **. *Eligible charges vary by property. **The Hotel Collection requires a two-night minimum stay.
- Book your travel through the Amex Travel App with added peace of mind – backed by American Express® service and support. Only for American Express® Card Members.
- Whenever you need us, we're here. Our Member Services team will ensure you are taken care of. From lost Card replacement to statement questions, we are available to help 24/7.
- No Foreign Transaction Fees.
- Annual Fee is $325.
- Terms Apply.