How To Apply & Get Approved For Global Entry
Update: Some offers mentioned below are no longer available. View the current offers here.
Last week, TPG Assistant Editor Melanie Wynne was approved for Global Entry, an expedited airport security status overseen by U.S. Customs and Border Protection. Here is the process she went through get her coveted Known Traveler Number--and how you can do it too.

Global Entry, the U.S. government's expedited immigration program for pre-approved, low-risk frequent international travelers, costs $100 to apply and is valid for five years upon acceptance. I'd been contemplating getting Global Entry for years, but had never actually investigated the application process. This year I began doing a fair bit of research about Global Entry for The Points Guy and I learned that not only is it fairly simple to apply, but it also increases the likelihood of being chosen for TSA Pre-Check.
Taking the leap, I spent 20 minutes filling out an online form, waited two months for an in-person interview, then met for 10 minutes with a cheerful U.S. Customs and Border Protection (CBP) officer at my local airport - LAX - and hooray, I can now speed through security both at home and abroad. The following is the process I went though, from beginning to end.
The Online Application
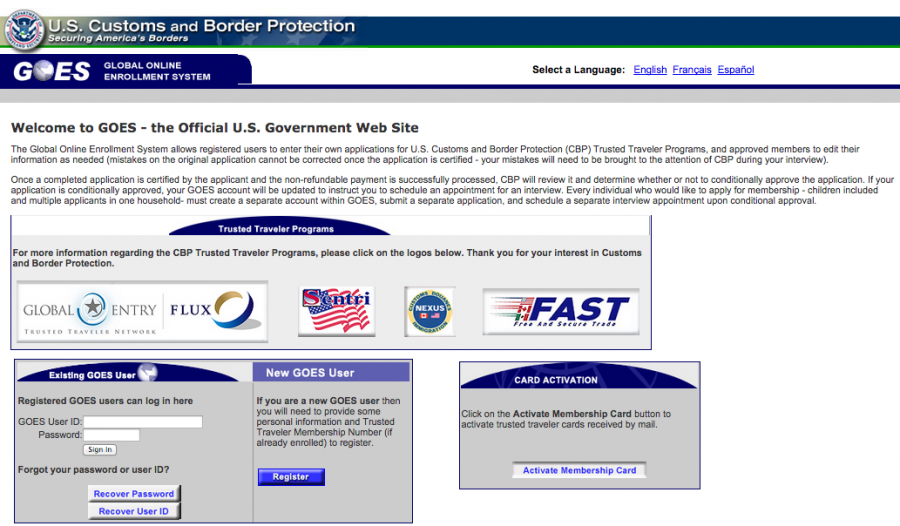
The website for CBP's Global Online Enrollment System (GOES) looks like it was updated in 1998, but it still manages to make the application process for Global Entry fairly simple. You're required to create a user ID and password, and upon doing so, you're notified that the U.S. Government may monitor your use of the GOES system. You should only enter GOES if you consent to this.

If you proceed, you'll be required to provide the following information:
- Name, address, phone numbers and email address
- Prior addresses up to 10 years
- Names you've used in the past that differ from the name you're using now (e.g., maiden or married names)
- Height, weight and eye color
- Language preference
- Date and place of birth
- Passport number and dates of issue/expiration
- Current employment status and recent employment history
- A list of the foreign countries you've visited
You must also answer whether or not you've ever been convicted of a felony (either in the U.S. or a foreign country), denied entrance to the U.S. by a U.S. government agency or been found in violation of U.S. customs or immigration laws. The CPB site's Global Entry section also notes that you won't be eligible if you have pending criminal charges or outstanding warrants, have been found in violation of any agriculture regulations or laws in any country or are the subject of an investigation by any federal, state, or local law enforcement agency.


Application Fee
Once you've completed your application, you'll be prompted to pay a non-refundable application fee of $100. Acceptable forms of payment are credit card (Visa, MasterCard, American Express and Discover), money order, or certified/cashier's check. Cash and personal checks are not accepted. I paid my application fee with my Chase Sapphire Preferred card, as it it gives me 2 Ultimate Rewards points for each $1 spent on travel-related purchases. Several credit cards offer GOES application fee reimbursements, such as the The Platinum Card® from American Express, AmEx Platinum Mercedes-Benz, The Business Platinum Card® from American Express and Centurion cards, as well as the new Citi Prestige Card.
Some elite flyers also have access to Global Entry reimbursements. If you're a Delta Diamond Medallion or a Delta Platinum Medallion member, you can select Global Entry as one of your Choice Benefits (two $100 vouchers for Diamond, one $100 voucher for Platinum), and United Air Lines offers its Global Services, MileagePlus Premier 1K and MileagePlus Premier Platinum members a personalized access code to receive their $100 reimbursement.
Interview Scheduling
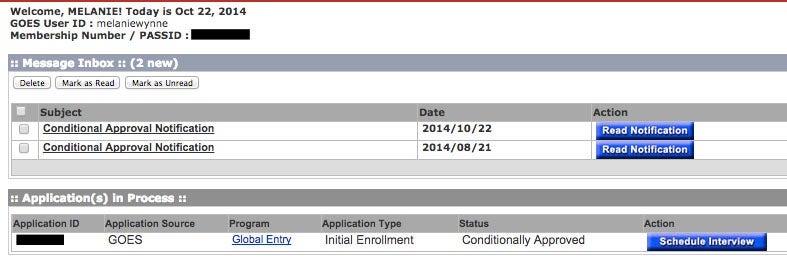
GOES will not call or email you about any changes in your application status. All GOES communications will be sent to you as private messages within your GOES account, labeled by subject and accompanied by blue, clickable buttons bearing instructions (see screenshot above). You will not be receiving confirmations or reminders about your status and appointment by email or phone.
Once GOES processed my credit card payment for the application fee, I received a notification within my GOES account that I'd been conditionally approved for Global Entry and should schedule an appointment time for an in-person interview with a CBP officer at my local Global Entry Enrollment Center. When I immediately went to request the next available appointment, I was dismayed to find the date would be a whopping two months away, but jumped on the first open time slot rather than delay the process any further.
Depending on your form of payment (credit card vs. money order/check) and CBP backlog, GOES notification of your conditional approval status can take between 24 hours and 10 days. Once you receive your conditional approval status, you have a 30-day grace period in which to log into your account and schedule your in-person interview. After 30 days have elapsed, you risk having to start the application process over again - and paying another $100 fee.
If you're offered an appointment date that's far in the future, consider the following options to reduce your wait time:
- Try booking your appointment with another, less-backlogged interview center in your area.
- Check back via the GOES website to see if there have been cancellations at your chosen interview center.
- Stop by the interview center the next time you're at the airport, and politely ask if someone can see you on the spot.
Interview and Approval Process
Remember that once you've scheduled an appointment with GOES, your enrollment center won't send you a confirmation or reminder, but they will certainly know to expect you. There is no need to re-confirm your appointment at any point.
Be prepared to have your photo taken from the neck up. Save time by making sure you know exactly where to park and find the center itself, and bring the following with you for your interview:
- A print-out of your letter of conditional approval
- Valid passport(s) or a permanent resident card
- Evidence of residency (e.g., a driver's license with your current address, a mortgage statement, utility bill, etc.)
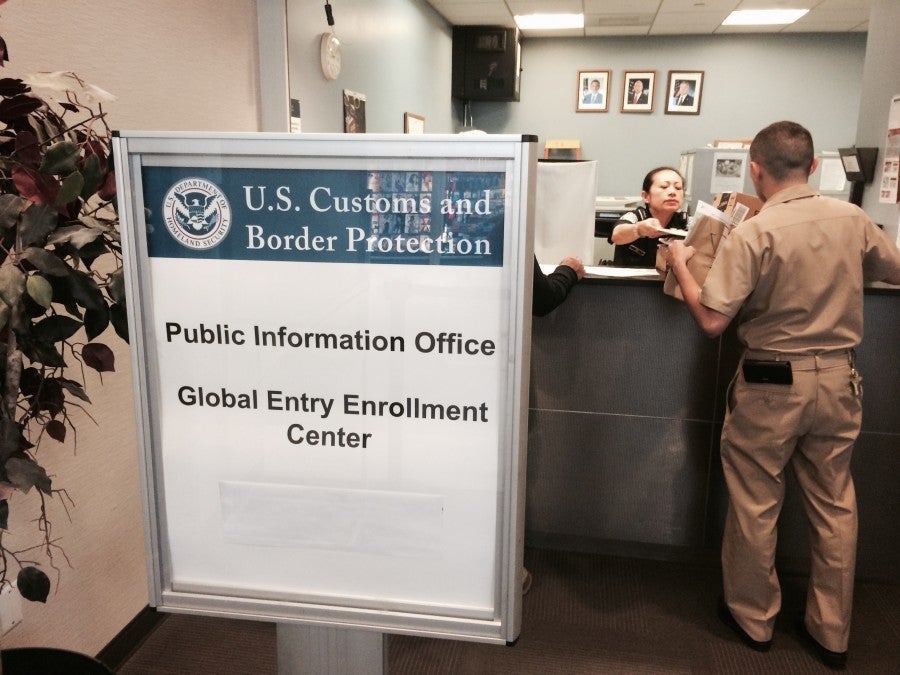
Once you've arrived at your enrollment center - and assuming your paperwork and legal history is in order - the actual Global Entry interview process should take between 15 and 30 minutes, depending on how busy the CBP officers are on the day of your appointment. My own interview at LAX took 15 minutes and was a real pleasure. At the front desk, I was greeted with a smile and waited only one minute before being ushered inside the office.
My interviewing officer was polite, efficient and had a good sense of humor. He asked to see my conditional approval letter, passport and driver's license, spent about five minutes getting my verbal confirmation that the details I'd provided on my application were correct, and took my fingerprints with an electronic fingerprint reader. He then wrote a nine-digit number on the printout of my letter and handed it across the desk to me, with the assurance that this would be my Known Traveler number. He said I'd receive my Global Entry card by mail within two weeks, but in the meantime, this number would be valid for booking travel.
After staring at my number in disbelief for a minute (as this had seemed bizarrely quick), I managed to collect myself and ask an important question: "Will my Global Entry Card give me automatic access to TSA Pre-Check?"
The officer shrugged his shoulders and said, "Well...not always, but providing your Known Traveler Number when you book flights will certainly increase your chances of being chosen for it. To be assured of having TSA Pre-Check every time, you'd need to apply separately. Just be sure to always provide your Known Traveler number when you book,and have your Global Entry card on you when you travel."
So there you have it, folks - straight from the mouth of a U.S. Customs and Border Patrol officer.
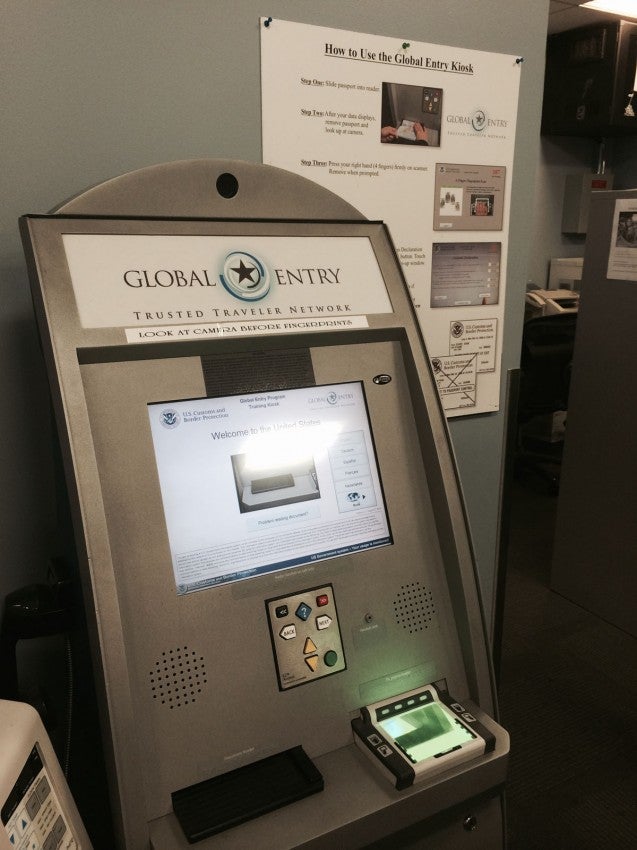
One last part of interview process remained before I was free to leave: a training session on how to use the Global Entry kiosk. The kiosk looks and functions similar to an airline's self-check-in kiosk, providing a read-strip where you scan your passport and provide the CBP with instant access to your personal/travel data. While scanning my passport, the officer asked me to look into the kiosk's built-in camera, await approval, and then remove my passport. He then showed me how to get a correct fingerprint reading from both hands on the kiosk's electronic fingerprint reader.
After prompting me to answer Yes or No to several customs declaration questions shown on the screen, and to confirm my flight information, he pointed out how and where to retrieve a receipt of my transaction from the kiosk. He advised that if my receipt is ever marked with an X when I'm arriving at customs, I should take it to the Passport Control officer in the booth closest to the kiosk and await approval. Otherwise, I'll be able to proceed past customs.
Upon completion of my training session, I was asked to double-check that I had all my paperwork and IDs, then was warmly thanked for coming in and graciously shown the door. Driving away from the airport a mere 20 minutes after I'd arrived, I wondered yet again why I had waited so long to go through this very simple process.
Activating Your Global Entry Card
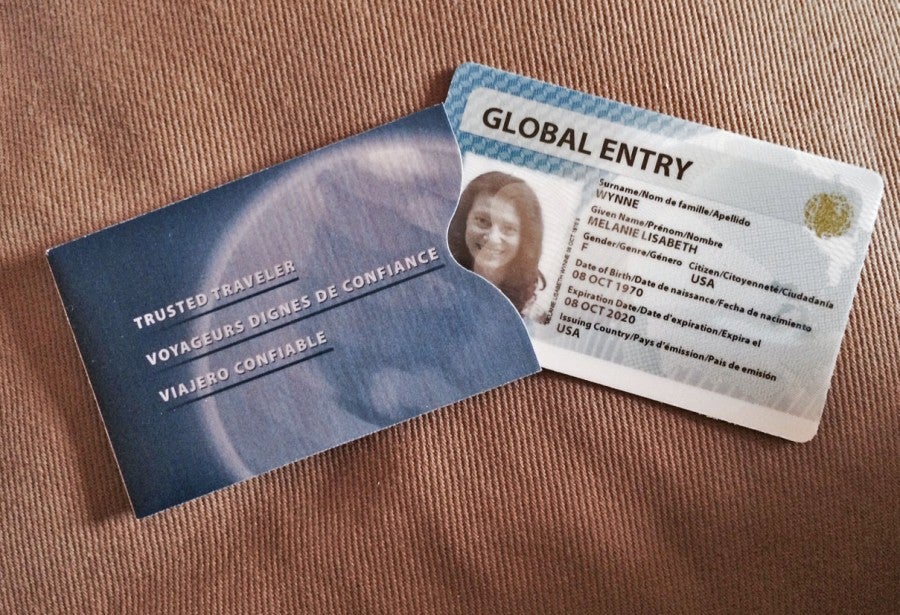
As promised, my Global Entry card arrived in the mail a couple of days ago, exactly one week after my approval - and while it doesn't feature my favorite photo of myself, it may yet prove to be the most wonderful thing in my wallet. When I flash it at airport security and customs, I'll be free to access Global Entry kiosks and blissfully short lines.
The card came with a protective storage sleeve designed to thwart hacking and security theft, as well as instructions on how to activate the card itself. As instructed, I went to the home page of the GOES site and clicked the "Activate Membership Card" button:
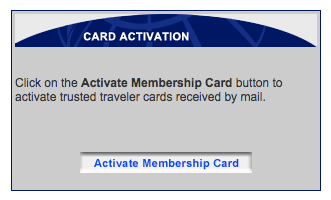
Then I followed the prompts to provide my Pass ID number and three-digit security code:
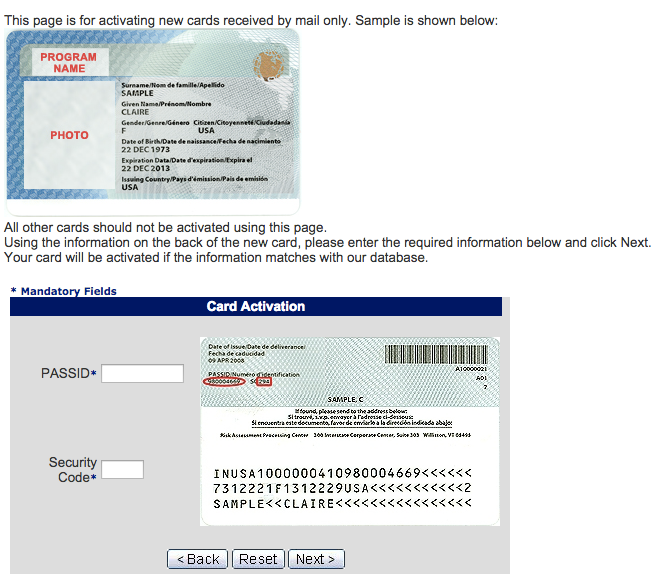
And voilá - my card's now all ready to use at participating airports. I'm tentatively planning some great trips abroad for next year, and I can hardly wait to not stand in long security and customs lines!
Related Posts:
Global Entry, Nexus and PreCheck: A Comprehensive Guide and FAQ
Top 12 Things You Didn't Know About Global Entry
My Experience Getting Refunded for Global Entry Using My Amex Platinum
Have you applied for Global Entry? How was your experience with the application and approval process? We'd love to hear about it.
TPG featured card
Rewards
| 2X miles | 2 miles per dollar on every purchase |
| 5X miles | 5 miles per dollar on flights and vacation rentals booked through Capital One Business Travel |
| 10X miles | 10 miles per dollar on hotels and rental cars booked through Capital One Business Travel |
Intro offer
Annual Fee
Recommended Credit
Why We Chose It
The Capital One Venture X Business Card has all the Capital One Venture X Rewards Credit Card has to offer and more. It offers an incredible welcome bonus and requires an equally impressive spend to qualify. In addition, the card comes with premium travel perks like annual travel credit. (Partner offer)Pros
- The Capital One Venture X business card has a very lucrative welcome offer.
- In addition, the card comes with many premium travel perks such as an annual $300 credit for bookings through Capital One Business Travel.
- Business owners are also able to add employee cards for free.
Cons
- The card requires significant spending to earn the welcome offer.
- Another drawback is that the annual travel credit can only be used on bookings made through Capital One Business Travel.
- LIMITED-TIME OFFER: Earn up to 400K bonus miles: 200K miles when you spend $30K in the first 3 months, and an additional 200k miles when you spend $150k in the first 6 months
- Earn unlimited 2X miles on every purchase, everywhere—with no limits or category restrictions
- Earn 10X miles on hotels and rental cars and 5X miles on flights and vacation rentals booked through Capital One Business Travel
- With no preset spending limit, enjoy big purchasing power that adapts so you can spend more and earn more rewards
- Empower your teams to make business purchases while earning rewards on their transactions, with free employee and virtual cards. Plus, automatically sync your transaction data with your accounting software and pay your vendors with ease
- Redeem your miles on flights, hotels and more. Plus, transfer your miles to any of the 15+ travel loyalty programs
- Every year, you'll get 10,000 bonus miles after your account anniversary date. Plus, receive an annual $300 credit for bookings made through Capital One Business Travel
- Receive up to a $120 credit for Global Entry or TSA PreCheck®. Enjoy access to 1,300+ airport lounges worldwide, including Capital One Lounge locations and Priority Pass™ lounges, after enrollment
- Enjoy a $100 experience credit and other premium benefits with every hotel and vacation rental booked from the Premier Collection
- This is a pay-in-full card, so your balance is due in full every month
- Top rated mobile app
Rewards Rate
| 2X miles | 2 miles per dollar on every purchase |
| 5X miles | 5 miles per dollar on flights and vacation rentals booked through Capital One Business Travel |
| 10X miles | 10 miles per dollar on hotels and rental cars booked through Capital One Business Travel |
Intro Offer
Earn 200K miles when you spend $30K in the first 3 months, and an additional 200K miles when you spend $150K in the first 6 monthsLIMITED-TIME OFFER: Earn up to 400K bonus milesAnnual Fee
$395Recommended Credit
Credit ranges are a variation of FICO® Score 8, one of many types of credit scores lenders may use when considering your credit card application.740-850Excellent
Why We Chose It
The Capital One Venture X Business Card has all the Capital One Venture X Rewards Credit Card has to offer and more. It offers an incredible welcome bonus and requires an equally impressive spend to qualify. In addition, the card comes with premium travel perks like annual travel credit. (Partner offer)Pros
- The Capital One Venture X business card has a very lucrative welcome offer.
- In addition, the card comes with many premium travel perks such as an annual $300 credit for bookings through Capital One Business Travel.
- Business owners are also able to add employee cards for free.
Cons
- The card requires significant spending to earn the welcome offer.
- Another drawback is that the annual travel credit can only be used on bookings made through Capital One Business Travel.
- LIMITED-TIME OFFER: Earn up to 400K bonus miles: 200K miles when you spend $30K in the first 3 months, and an additional 200k miles when you spend $150k in the first 6 months
- Earn unlimited 2X miles on every purchase, everywhere—with no limits or category restrictions
- Earn 10X miles on hotels and rental cars and 5X miles on flights and vacation rentals booked through Capital One Business Travel
- With no preset spending limit, enjoy big purchasing power that adapts so you can spend more and earn more rewards
- Empower your teams to make business purchases while earning rewards on their transactions, with free employee and virtual cards. Plus, automatically sync your transaction data with your accounting software and pay your vendors with ease
- Redeem your miles on flights, hotels and more. Plus, transfer your miles to any of the 15+ travel loyalty programs
- Every year, you'll get 10,000 bonus miles after your account anniversary date. Plus, receive an annual $300 credit for bookings made through Capital One Business Travel
- Receive up to a $120 credit for Global Entry or TSA PreCheck®. Enjoy access to 1,300+ airport lounges worldwide, including Capital One Lounge locations and Priority Pass™ lounges, after enrollment
- Enjoy a $100 experience credit and other premium benefits with every hotel and vacation rental booked from the Premier Collection
- This is a pay-in-full card, so your balance is due in full every month
- Top rated mobile app

